Saturday, September 28, 2019

D-8, D-9, D-10


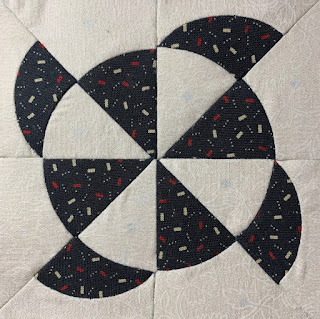
D-8

This wasn't a difficult block.  The trick is to get the points to meet in the center and straight lines.  This can be accomplished by using a ruler and a pencil to draw a cross to follow when laying out pieces. If you set the tips of the ovals on the line, everything will be straight.  Although this could also be done for the corner diamonds, it isn't really necessary.  as long as the center ovals line up, the corner pieces should line up easily.   I like to keep the fabric on the paper pieces to applique.   I apply some glue on the fabric that is turned over on the back of the paper and press it into place.  I do one piece at a time.  Once the four are on, take a stitch through all four tips and securely draw together.  I have found that makes it look more perfectly lined up.  Then glue the entire block onto a 4.5 piece of fabric. 


D-9

I made the EPP modification of this block. It wasn't difficult, I didn't think to match the plaid in the center piece.. But I remembered my motto..
Work from the center out.  Make the center 7 piece square first. Attach a rectangle to each side, then a rectangle with 2 triangles to the opposite sides.  Last attach the 3 piece corner units.. then your block is finished.


D-10

With this block, I decided to piece the original as I still had to modify how I made the EPP version.
I absolutely hate EPP half square triangles!!!  At first, I thought that I would machine paper piece the entire center and attach it to card stock.  I tried several different ways to do it.
finally,
I printed out a paper piece pattern onto card stock.  Then I made HST using THANGLES 
which is the absolutely easiest way to make HST.  then I put the card stock pattern onto the finished HST and glued.  I did this with the pieces for the modified version too.  But I decided that I could just as easily make the original version.  Well... not entirely easy, it isn't perfect, but I like it better.  Sometimes it is worth the extra time to make the original and sometimes it just isn't.


Keep stitching!!!  T

D-5 ,D-6, D-7


 D-5
I liked working on D-5.  It was simple to do.  I like mixing the prints, if not the colors.  I especially like if I can fussy cut the center on blocks that have large pieces. 


The only tip that I have is to piece the outer triangles and borders separately and attach .  just be aware of the DIRECTIONAL pieces in the edge borders.

D-6

This was a really easy block. But it would have been more complicated if i had EPP the corners on.  So it was easy to paper piece on my machine and then attach the finished block  to a 4.5 piece of card stock.

D-7
This block turned out perfect.  The only thing is the striped fabric is the same as the alternate block in the row before.  So rather than have two blocks next to each other, I will need to move this further down the row.  I need to be more aware of prints since I am only using 3 colors.  I have a lot of fabric, but the limitations in color make it difficult.
The tip for this block is to piece the center square and two rectangles first, then piece two sides of two triangular units and rectangle and attach them to the center strip.  I hope this makes sense, I didn't think to take photos.                        

Okay, on to the next three!  T

Saturday, September 21, 2019

D-1, D-2, D-3, D4

 D-1

This row I decided to see if some of the blocks could be made more like the original.  This block was modified for EPP  it basically had 4 squares in the center with one crosshatch to separate them.  I have the Dear Jane Electric Quilt program, so I printed out a paper pieced version for this.  That way I could ad the diagonal piece across each square.  I then glued it onto a 3x5 piece of card stock and joined the borders in the normal EPP way.

 D-2

I had a difficult time with this block.  I wanted it to be like the original so I paper pieced the corner triangles.  The original had a little blue triangle at the bottom of each corner piece so it looked like a half square triangle with the little white triangle in the center.  The paper piecing went okay, but I just couldn't get a good match for the hst.  H appliqued all of the center snowballs down and joined it all up anyway.. First try in the garbage.  I fiddled with this block for a long time.  finally I decided to give up the idea of the HST and pieced it like the modification.  The only change I made was to the center.  I pieced a small square to the center instead of going with applique there.  
 I folded the pieces leaving each circled area open so that those could be folded over the edge of the center paper piece.  It looks much better that way. 

In this picture, you can see the paper pieced corner sections and how the little blue triangles don't match.  Afterwards, I thought that I could have appliqued triangles there.  But making this block twice was enough. 

 
 D-3
This was also a modified block.  Instead of one piece like I made, they had 4 pieces that met in the middle.  I don't know why they would do that.. But I made mine like the original and appliqued the one piece down, and then glued it to the 4.5" piece of card stock included for EPP.

 I used my light pad to position the block before I glued it down. 

D-4

This was another modified block.  But, I attempted to make this by paper piecing the borders with the triangles.. I even did the Y- seams, appliqued on the leaves, but my one mistake was that I forgot to leave enough seam allowance to turn over the edge of a 4.5" card. 

 I finally ended up appliqueing all of it as was intended by the modification in the first place.  I liked the pieced version,but this one will work out just as well.


Until next time.....Happy Stitching! T

C-10.C-11,C-12,C-13


C-10
This is a modified block for EPP.  I actually modified my block from the suggestion by dividing the corner pieces to make a continuous red line around.  Either way, it's okay.  Not one of my favorite looking blocks. 

C-11
Another curved block. I enjoy doing curves, so this was fun
I pieced it into four sections and then sewed them together.  It seems easier to do being able to cut it down into sections.

C-12
This is basically an easy block, but Sometimes all of the tiny pieces are just too fiddly.  no matter what, there is a bulk of fabric behind each 1/2" square.  If this was a miniature quilt I would trim the seams, but this will be a normal size quilt that will be used, so the seams need to be at least 1/4".  The last thing I want is to lose a seam in the middle of a finished quilt!

I rotary cut pieces of fabric.  I cut
25- red 1x1"
20 white 1x1"
4 white 2 1/4" squares

I have a 6x6" foam core board, that I covered with fine grit sandpaper when I was finished with this block.  It is the perfect size to lay out the pieces of the block.  The sandpaper keeps the pieces from sliding off. 


Monday, September 9, 2019

C-7, C-8. C-9

I think that around this point, after dragging everything out every time I made a block, I decided to prep the rest of the blocks in the row. It took a while, but I'm glad that I did it.  Now I just pull out the ziploc with the pieces and get to work. Plus it breaks up monotony.. a big thing for me.  I don't want to stop again.


 C-7

This block to quite a bit of pre-planning.  For the pieces with the appliqued diamonds, I cut triangles, and rectangles at larger sizes than required.  I used a pencil to draw a straight line to position the diamonds on.  I left the paper's in, and stitched the pieces down. then I slit the back and pulled the paper out.  This still didn't alleviate all of the bulk in the tips, but, at least the edges are straight.
When I finished with the applique, I used a LIGHTPAD 
to position the pieces.  I tacked the paper down with a little glue, and trimmed the seam allowance to the appropriate size.

I did all of this as prep-work.  After the pieces were ready to sew together, I put them into a ziploc until I was ready to make the block. 

C-8
I am finding that I like using more than one fabric for the main color.  I like the print for this one, but it wouldn't have looked right in the tiny pieces.  This was not that difficult.  Just start from the center and work out in sections.  I did the square in square first, then attached finished corners.  The short outer corners are applied first, the the longer triangles last.


I also wanted to show that I sew the sashes and cornerstones on as I go along.  When I get 3 or 4 blocks made, I sew them together and join them to the row.  No more long endless seams for me.   


C-9

The author called this block "Jane's Tears"  This is the one block that I didn't change to a family or friend's name.  I can see many a tear shed making this quilt.  I would give them to Jane. 

The hardest part for me making this easy block, is I had to cut the background pieces again so that I could get the print going in the direction that I wanted. 

In prep, I appliqued the tears onto oversized triangles then used a lightpad to position them.  This was an easy block because by the time I pulled the 4 pieces out of the ziploc, all I had to do was sew them together.  I'm hoping at some point to figure out the best way to applique.  They just don't look smooth around the edges to me.  I kept the papers on, and removed them from the back... but I have a motto..


Happy stitching!  T


C-4, C-5, C-6

 C-4

This block is pretty straightforward.  I decided to use more than one shade of red.  Kind of gives it a dimensional look.  The only thing to remember with this block is that the outside corner triangles are directional.  Make sure you label the pieces before attaching the fabric so they go the right direction. 


 C-5

I loved making this block,  I never realized how easy little curves are to do until I tried them with EPP.
I did have a little trouble getting the center points perfectThere is a lot of fabric points coming together there.  I can do it on a machine, but I haven't mastered it by hand.  But, right now my motto is "Better finished than Perfect"  That's a big step for me. 
 Remember, the outside portions of this circle are directional, mark your pieces so that you put your fabrics on the correct sides.  

C-6

Another curvy block.  I enjoyed making this.  I did snap some photos of a couple things that I did as I made this block.
 When I pieced this, I pieced the outer sections first.  I think it was easier in the long run to do this in sections.
Another thing that I have learned when making this quilt (as I said this is my first EPP project) is what I guess is called flat back stitching.  I have a friend that actually lays her pieces on a surface and stitches.  I find that really difficult.  I couldn't get a picture, but I hold the pieces in my hand and catch the fabrics on the back.  the stitches don't show through to the front.

Another thing I do that I find makes it easier to get a perfect fit, I throw a few stitches in each end to secure then start in an end and work to the middle.  By then I usually need to change thread, so I start at the other end and work to the middle.  A perfect way to ease a piece in nice and flat.

The last few blocks that I've made, I have tacked an end and then taken several "basting stitches to the other end.  Then I turn and sew properly.  The piece is already basted in and I know it will fit perfectly.

I hope that this helps you!  T

C-1, C-2, C-3


C-1
 
This was my first block after a 2 year break.  Somewhere I had misplaced all of the pieces for it. I don't think that I ever made it.  Or if I did, I couldn't find a finished block.  So I went to my Electric Quilt Dear Jane program and printed out the pieces for the block.  I pieced it and it was terrible.  the pieces weren't right and it kind of bowed up in the center.  I tossed out my first attempt, and tried it again, making sure that I measured along the way, and the second attempt was okay.  

What I learned with this block is, with the longer pieces, rotary cut strips of fabric.  It saves on fabric, and you won't be left with large, bulky seams.  These straight pieces were 1/2" so I cut the strips at 1" so that the back fabric would just come together and not over lap.  Knowledge that I am taking with me when I prep more sashings.  Another thing is you can make the most of your blocks if you can fussy cut fabrics.  The little stars and the outer border are from the same print.  

C-2

This is a modified block.  Pretty straightforward.  I pieced the big center diamond first and added onto that.  It is important to know what pieces you have.  I have a 12" square felt board and with more difficult blocks I lay them out and work from there.  The two outer diamonds are LARGER than the rest.  Also the surrounding background is DIRECTIONAL.  Make sure you write Back on each of those pieces so that when you are applying the fabric you put it on the correct side. 


C-3

This was a fairly simple block. The important things to remember are, Lay out your pieces and work from there.  Piece in sections.  For instance, I pieced the four patches first, then the "Rails".  I pieced the top section first, then the middle, I joined them, then added the bottom section. 
Laying your pieces out and working from a board helps insure that you have all of your colors going in the right spots.  It's a simple block, but pieces can easily get flipped around


THE BLOCKS


At this point, when I started this blog, I had already completed the first two rows. I think that I have the most trouble with blocks with applique.  It's not that I can't do hand applique.  I kind of think I take tiny neat stitches.  It is the bulk in the tiny pieces that throws me.  I can't figure if I should applique with the papers in, or take them out and do it that way.  I do remember that on block B-1 I finally made the circles with "Perfect circles".  I starched them and gathered the fabric around the mylar templates.  That worked out great and I was happy with the result.  I was less happy about B-5 because the Diamonds are just too bulky at the tips.  Oh well.  I know that I am a perfectionist, but I would drive myself crazy if I had to re-do every block that I didn't think was absolutely perfect. 

I am going to start with C-1 because row C is the row that I am currently on, so I won't need to remember what I did 2 years ago.   See my next post!  T

Wednesday, September 4, 2019

TOOLS

I want to share some of the tools that I have found that make everything easier to do.  I have learned some by reading what others are doing, and I try them.  That is the beauty of social media, we can learn so much from each other and there is always help at our fingertips

MY WORKSTATION

My husband made this little lap workstation for me out of Cherry plywood. It holds everything I need to work on a block.  Someday, I will get around to making a proper cover for the top but right now there is batting taped on I had the idea of making it a surface that I could lay out blocks and they wouldn't slide off.  The bottom portion holds my thread.. I have a shorter dowel to put my thimble so I don't lose it.  My glasses, and tins that hold prepped sashing and cornerstones. 
I got a clip on lamp from Amazon, which provides a lot of light..

THREAD
I did a lot of reading when I first started EPP and basically, they said not to go with cotton thread because the constant pulling against the papers weakens the fibers and it will eventually break down.  They suggested a poly thread.  Someone may have even mention Bottom Line from Superior Threads.  Anyway, that is what I went with.  I like it.  It is almost like hand sewing with silk.  But I get tiny stitches and they stay well hidden.  It comes in many colors, but I generally use these 3, and I have a more tan color for fabrics that need it. 

NEEDLES
My eyes are getting old, and I find it more difficult to thread some of these hand needles with the tiny eyes, so it is so much easier to use my Clover needle threader.  The problem is, finding a needle with an eye that will work easily with it.  Needles are basically the same.. it's the eyes that are different.  John James and Richard Hemming are great needles, that have fairly decent eyes.  I've used applique needles and Sharps.  Both are nice.  I have used Straw needles, but I can't thread them.. to see, or to use in my threader.   After a lot of trial and error, I have finally landed on two brands.  Roxanne applique needles, Made in England,  have a fairly good sized eye that I can thread free-hand.  They work in my threader, but not consistently.  The latest applique needles are Bohin size 11.  They are made in France.  The eye is large and more round and I have had no problems with them in my threader.  I am able to get nice stitches, and they are a nice length.


PROJECT BOX 
I put a rows worth of block pieces and the tools that I need to make them in a thin 9 x 12 box.  This way I don't have only what I need for the row that I am working on
Recently, I decided to make copies of patterns to include in the bag with all of the block pieces.  Truthfully, I wish I would have thought of this before I marked up my book, that is no longer being published.  Anyway, then when I want to get a block ready, I have the layout and color map, and pieces all accessible. and I don't need to drag out the book.  Also it eliminates confusion because some of the blocks are modified.  So far it has work out great. 

THE PROJECT BOOK

Whenever I am working on something special, normally when I was making a miniature quilt for competition, I make a project book to keep track of what I do, fabrics, problems that I ran into etc.  I figured that this quilt deserved a project book since it will take me so long to finish.  I started in a lined composition book, but it was getting pretty beat up so I moved everything over to a hard cover graph paper Moleskine journal.  It has a nice pocket in the back to put extra photos or whatever I accumulate doing this.  When I'm done with a block, I take a photo and put in in a collage app on my phone. Then I print out the photos and glue them in.


The nice thing about graph paper is that I can plan the rest of the quilt out.  Places just waiting for the finished photos. 
Brenda Papadakis named all of Jane's blocks.  Many have a person's names.  I decided that with my quilt, I would name the blocks after my family and friends, substituting her names for my own. 


OTHER TOOLS

I'm sure that I will think of things as I go along, but the few other things that I can think of that I use all of the time are

CLIPS  Okay, you don't need a hundred.  But I have ordered these.. especially if I want to include them in gifts, sometimes they even come from China.. but you can't beat the prices

GINGHER SNIPS I love these snips.  They are sharp, easy to use, and well made.  And you can take them when you are flying. 

SEWLINE FABRIC GLUE PENS When I work with hexies I thread baste.  But I go through a lot of glue making this quilt.  I think that you can even subscribe to the refills on Amazon.  I'm seriously considering it.. 

PERFECT SCISSORS
I love these scissors.. They are serrated, so fabric doesn't slip when cutting.  The handles are over- sized and soft silicone.  I have all of the sizes but I use the purple and teal handles the most often. 

I hope that you have found some of my ideas helpful.  I'm sure new things will pop into my mind as we go along. 
Have a good day!


Tuesday, September 3, 2019

WHAT WHOULD JANE THINK?

Hi,
Thanks for joining me on my journey to complete Jane's Legacy quilt replica.  I guess saying" D.J."  is illegal or something? I don't know..

While working on this quilt, I often wonder what Jane would think of what would become of the quilt that she created?  It's hard to wonder what the future holds for the beautiful things we create.  Will others understand and appreciate the patience and time it took to make your creation?  Let alone that people appreciate what you did so much that they make their own version?  It's pretty mind-boggling.

I've had the book since it was first published.. then I bought the EQ5 program.  I never started it for many reasons.  One of them being, I never really like to make something that so many others are making.  I didn't want to hand piece and worry about seam allowances etc, I didn't want to machine piece and have to sit at my machine for long periods fiddling around with small blocks.. AND, I just couldn't decide on colors for a project.  I really like black and brights, so I thought of doing that, but just never did.  Not until a couple of years ago, (2017) when PAPER PIECES developed a pack of English paper piecing papers for the entire quilt.  And they had a quilt-along.

Now, I had never done English paper piecing before, so this was going to be a new experience.. kind of learn as I go along.  I decided on colors.. a more patriotic version reds, "whites ", and Blues.. Many of the fabrics were Moda, many were from Primitive Gatherings, so it is more "country" colors.

This post is just an introduction.  My plan, and the reason that I started this blog was to post as I make blocks.  I hope to share tips and tricks to piecing a Dear Jane Quilt using English Paper piecing.  Although I have quilted my whole long life, I am new to English Paper Piecing (EPP) so I would welcome any comments if you have found easier ways to do things.

Also, with the exception of comments I may have made in my project book, I am going to start may of the tips on row C.

I started making my blocks in 2017, but after sashing all of the blocks, I took a break when I started joining the rows.  I didn't realize until I picked up the project again that TWO years had gone by.. It really didn't seem like that long, I'm ashamed to say..

I have figured out a trick to take the boring out of joining the long rows by hand. I will be sharing it as I go along..

I am going to enjoy the journey, I hope that you do too!

STILL THINKING ABOUT IT

 After finally finishing all of the blocks for the center, and one border, I've probably taken too long of a break.. I still have 3 bord...